Tuesday, 3 May 2016

Download Windows 7 Tweak Utility To Speed Up Your Machine

Download Windows 7 Tweak Utility To Speed Up Your Machine


Features including:
  • Add “Copy To” option in files and folders context menu, so that you can easily copy them to other locations
  • Add “Move To” option in files and folders context menu, so that you can easily move them to other locations
  • Set Windows to automatically end task of programs which are either hanged or taking longer time than expected to exit
  • Decrease menus show delay time, it’ll show the sub-menus fast when you select their parent menu
  • Disable the low disk space check so that you don’t get the annoying low disk space notification in system tray
  • Set Windows to not waste time in searching for a program which no longer exists in your system when you try to open its shortcut
  • Disable “search on Internet” prompt in “Open with” window so that it directly opens the program list
  • Add “Take Ownership” option in files and folders context menu so that you can easily take ownership of files and folders in case you want to replace them for customization purpose
  • Speed up the Explorer navigation by disabling network printers and network scheduled tasks
  • Add “Command Prompt Here” option on folders context menu (right click) for a quick command prompt opening at the selected folder
  • Adds “Open With Notepad” option on files context menu (right click) for a quick viewing of files content
  • Adds “Delete Folder Content” option on folders context menu (right click) to quick delete only the content of a folder without accessing the folder
  • Speeds up taskbar thumbnail preview by reducing the mouse hover time delay
  • Disables (Turn Off) Annoying UAC (User Account Control) and suppress UAC consent prompt dialog
When you click on the options there will be more information show up about the particular option.
Click apply to apply the change, reboot may be required. Defaults will restore the setting to the original status. Export will allow you to export the registry file.
What Is Defragmentation How To Defrag In Windows 7 Using Command Line

What Is Defragmentation How To Defrag In Windows 7 Using Command Line


The new disk defragmentations are mainly focused on the system performance, try to minimize the number of times a disk read or write request is issued and try to transfer data in relatively larger data blocks. This way it improves the system performance.

So what exactly is defragmentation and how is that help the performance of my system?

During our usage of computer there will be many files come and out, hard drive is the place to shore all the files. When file A first come to the system, the operating system will try to find the largest possible continuous data blocks for the file, when it do, the file is placed on the disk. Say you need to make few changes on this file, now that the size of the file has grow larger, the problem is the extra file space are not write continuously now. Since the OS does not know how large the file will expend, hence OS will not pre-define the space file A need for size extension. The only way to store the extra information is to have it store elsewhere. This result the file fragmentation, another words the file is no longer continuous, it is broken up into parts.

The result of disk fragmentation will be the extra I/O hard drive need to perform in order to read/write the file. Moreover, this extra physical performance will reduce the speed in CPU utilization and ultimately affects your system’s performance. [Note: There are mainly two different types of fragmentation, the one we have illustrated are the External Fragmentation, to discover more click here ]

So with this said, how we do know if the file on our hard drive is broken apart or not?

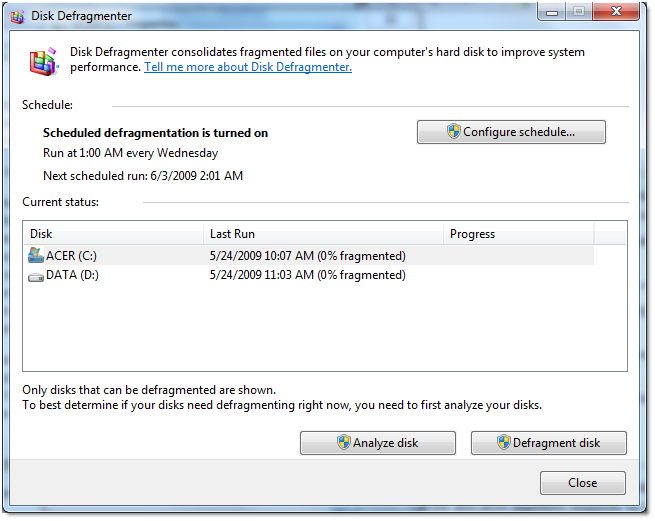
To find out, we can use the build-in disk fragmentation utility.

Right click the hard drive -> Properties -> Tools -> Defragmentation -> Defragment Now…


This will bring you up the UI version of defragmentation.


If you are a geek like us, you can also try to use the command line disk defragments.
To do:
  • Open up the command port -> Start manual -> cmd
  • Type the command “defrag”
This will show you a list of options, for examples defrag C: /U /V this will defrag your C drive and print out the progress and results

What Is Defragmentation How To Defrag In Windows 7 Using Command Line 1


Just an example of my hard drive’s defragmentation

What Is Defragmentation How To Defrag In Windows 7 Using Command Line 2


This is before,

What Is Defragmentation How To Defrag In Windows 7 Using Command Line 3


This is after. Notice the difference in largest free space size, and average free space size? That’s a big difference.

My average free space size went from 468 KB to 19.81 MB and I’ve also extends my largest free space size.

Hopefully now your hard drive will be smooth, and increase your system performance.

Note: there is no need to do this often; usually the process will take few hours depending on the size of your hard drive. The larger you’re hard drive and the more file you have on your hard drive, the longer the process will take. If you have a SSD has your hard drive, than you might want to consider performing less disk defragment. Since there are a limited number of times to read and write to the SSD, disk defragmentation will need to both read and rewrite the file, hence result your SSD to die quicker than normal disk.


Sunday, 1 May 2016

How To Show File Extension In Windows 7 With Keyboard Shortcut

How To Show File Extension In Windows 7 With Keyboard Shortcut


Ever wonder how you can show file extension in Windows 7? (This applies to Vista as well) Now you can toggle to show/off file extension with one keyboard shortcut. Thanks to Hot-To-Geek, you can now show the file extension just like the old days. To do this you need to download a program, get it here. After you’ve install the program, this will auto run at start up, meaning whenever your PC starts this program will run in the background.
 
 
BEFORE
 
How To Show File Extension In Windows 7 With Keyboard Shortcut
 
  
AFTER
 
How to show file extension in Windows 7 with keyboard shortcut
 
 
With the hot key WINDOWS+Y


You can stop the program running via going to the task manager -> ToggleFileExt.exe -> End Process
 

Native Boot To Windows 7 In VHD From Windows Vista

Native Boot to Windows 7 in VHD from Windows Vista


Now we now we can native boot to a Windows 7 installed VHD file, but it requires you have Windows 7 installed on the host computer. Is it possible to do the same from a Windows Vista installed machine? For example, I have Windows Vista installed on the physical machine and I have Windows 7 installed on a VHD file. Can I native boot to that Windows 7 VHD on the same machine without having to boot to Vista first? Well, definitely!
The trick is to upgrade the Windows bootloader on Vista to the version compatible with Windows 7, which requires 3 steps as follow:

Step 1: Get a copy of Windows 7 bootloader from a Windows 7 computer 
and save it to the external USB drive.

Basically, we need to copy 2 files from a Windows 7 system, bootmgr from c:\ and bcdedit.exe from c:\windows\system32. Connect the USB drive (assuming connected to drive F:) and run the following command from dos prompt window.
c:\windows\system32>xcopy /h /y bcdedit.exe f:\
c:\windows\system32>cd \
c:\>xcopy /h /y bootmgr f:\
Now we have got a copy of windows 7 bootloader on the USB, and let’s move to next. Note that the edition has to match on both Vista and 7, like 32bit of bootloader on 7 can only be used on 32bit Vista, or the boot will fail.
Step 2: Backup the current bootloader on Vista

They are the same two files on Vista machine in the same location that needed to be backed up before we overwrite them with the Windows 7 version. You can just make a copy of them on the same computer.
c:\windows\system32>xcopy /y /h bcdedit.exe bcdedit.org
press f (for file) when prompted.
c:\windows\system32>cd\
c:\>xcopy /y /h bootmgr bootmgr.org
press f (for file) when prompted.
Now it’s ready for the step 3.

Step 3: Replace the bootloader on Vista with the copy we obtained on step 1

First, you need to boot to Windows Recovery Environment by booting to Vista bootable DVD or Windows 7 boot DVD. Once you get in to the dos prompt window in recovery mode, run the following commands in order.
c:\>attrib bootmgr –s –h –r (change the bootmgr file attribute so it becomes replaceable)
c:\>e: (or whatever the drive that used for the USB drive you connected)
e:\>xcopy /y /h bootmgr c:\bootmgr
e:\>xcopy /y /h bcdedit.exe c:\windows\system32
Now, your Vista machine has native VHD support feature on.
Assuming you already have a bootable Windows 7 VHD ready on the Vista. If not, follow the instruction on how to native boot to Windows 7 in VHD to create one first and have it ready on the Vista machine. And then reboot the computer and do the following to add the VHD boot entry to the bootloader or follow the step 3 on how to native boot to Windows 7 in VHD.
bcdedit /copy {current} /d “Boot Description“
bcdedit /set {GUID from last step} osdevice vhd=[DriveLetter:]\PathToVHD\VHD_File
bcdedit /set {GUID from last step} device vhd=[DriveLetter:]\PathToVHD\VHD_File

Now, reboot your Vista computer and you will be prompted with two choices to boot. VHD is one of them.

How To Change User Profile Default Location In Windows 7

How To Change User Profile Default Location In Windows 7


The default location of user profile in Windows 7 is still the same as Vista, in c:\users folder, which I often find it seems quite dumb putting user profiles in the same partition as the system, especially when I store most of my day-to-day files in my user profile, rather than another folder in another partition. So my preference of the first step after installing the OS on my own computer is always to change the default location to another partition before I actually start setting up my profile.

Normally, you can do that by either using a pre-defined unattended install file or moving the individual folders inside the user profile which also will update the registry keys accordingly to reflect the change.
However, here is what I’ve done normally.

Warning before you attempt to make any change in the registry make sure you have the original registry backed up. This can save your mess if you did something wrong.

1. Copy the original Default profile folder in C:\users to the new location. (by default this “Default” directory is hidden, you need to go Tools > Folder Options > View (tab) > Show Hidden files, folders, and drivers.)

2. Copy the original Public profile folder in C:\users to the new location. (let’s say D:\ drive)

3. Open Registry Editor by type Regedit from the command line, and navigate to 

HKEY_LOCAL_MACHINE\SOFTWARE\MICROSOFT\WINDOWS NT\CurrentVersion\ProfileList.

4. Change the value of the Default, Public, Profile Directory keys to the new location accordingly.

5. Log off. From this point on, any new user logged in to this computer will have a new user profile that’s located in the new location.


How to Change User Profile Default Location in Windows 7


Before changing the registry.

How to Change User Profile Default Location in Windows 7


After changing the registry.(as using D:\ drive for example)

6. When you logged into your new account (make sure with the new profile location) you can now delete your old account prior to the change.
A few notes:
  • It applies to Windows Vista as well.
  • There will be a lot more steps to move a user profile that’s already been generated. So highly recommend that doing so as early as you can. A brand new fresh profile is always better.
  • see this post when you failed to upgrade due to the change of the user profile location
  • If you’ve done everything and see an error message in your user profile directory saying “Some library features are unavailable due to unsupported library locations. Click here to learn more …”
How to Change User Profile Default Location in Windows 7


Native VHD Boot To Windows 7

Native VHD Boot To Windows 7


Now we have native supported VHD in Windows 7, so what are we going to do about it? One use I found very useful is to native boot to a Windows 7 installed VHD. Why? because it allows me to have multiple Windows systems installed on my computer without using addition hard drives, playing around disk partitions, etc. So how? Here is a 1-2-3.

Step 1 – Create and Attach a VHD

You can simply follow my previous post how to create attach a VHD in windows 7, in which it describes two options to create a VHD natively in Windows 7.
Step 2 – Apply a Windows 7 image to the VHD volume

In order to natively boot to Window 7 image in the VHD file, you have to apply an image to the partition in the VHD. Running Setup from the install DVD and selecting a partition in a VHD for installation is NOT supported. You can simply use Install-WindowsImage Powershell script to apply the Windows 7 image for VHD boot. There is a step-by-step instructions on the site that describes in detail. Here is how in short.
First, have a Windows 7 distribution DVD ready, which contains two WIM files that this script needs to apply the image.
  • \sources\boot.wim, the WinPE image used for RAM disk boot to run Windows setup.
  • \sources\install.wim, the actual Windows 7 image file.
and, download the script from the MSDN code gallery, and save it in a location that you can use later.
Then, launch Powershell in administrator mode by right-clicking Powershell and choosing Run as administrator.
Then, using the following command to list the available images included in the \sources\install.wim image file.
PS >install-windowsimage.ps1 –wim d:\sources\install.wim (assuming the DVD media is in drive D:)

Run the following while you are still in Powershell to enable running unsigned local scripts.
PS > set-executionpolicy remotesigned
And, once you located the index number for the edition of Windows 7, run the following command to start applying the image to the VHD file. Change the index number and the destination drive letter to reflect your settings.

Native VHD Boot to Windows 7


Now you have a bootable Windows 7 installed VHD ready. It looks pretty complicated but believe me, it’s very straightforward. Just follow the instruction and you will be fine. Let’s move to the next step.

Step 3 – Configure the VHD for native boot

In order to natively boot to Windows 7 installed VHD, you need to update the boot configuration on your computer that hosts the VHD to add a new entry to the Windows Boot Loader.
Assuming you have VHD saved in D:\VHD folder, here is two steps to make it work.
First, generating a new entry by copying the current boot loader as following, which will also print out a new generated GUID which you will be using in the next command:

bcdedit /copy {current} /d “Boot Description“

And, update the entry by specifying the VHD path for OS to use.

bcdedit /set {GUID from last step} osdevice vhd=[DriveLetter:]\PathToVHD\VHD_File
bcdedit /set {GUID from last step} device vhd=[DriveLetter:]\PathToVHD\VHD_File

Once it’s done, type bcdedit and you will see something like this below:

Native VHD Boot to Windows 7


And you all set, reboot your computer and you will see two boot entries for you to choose. Select the VHD one and hit enter, and you will be seeing glowing Windows Logo in a few seconds.

If you have any question or are running into any trouble getting this set properly, feel free to leave in the comments below.


How To Create, Attach A VHD In Windows 7

How to Create, Attach a VHD in Windows 7

One of the good things Microsoft puts in Windows 7 for virtualization is the native support of VHD, which stands for Virtual Hard Disk. If you have used Virtual PC before, VHD shouldn’t be a stranger to you. Since Windows 7, you can easily create, attach, detach VHD files right in the system without using a Virtual platform. You can simply treat a VHD file as a removable disk, like your USB external storage.
There are two ways of doing it, one on the command line and the other uses GUI. Depending on which one you prefer, they are pretty much do the same thing with the same result.
Diskpart – command line
Open an administrator command window. The following are the diskpart commands to create a dynamic VHD that is 25G maximum size, saved in c:\vhd folder. It also formats the partition to NTFS in quick mode, and assigns a driver letter V.
DISKPART
CREATE VDISK FILE=C:\VHD\<filename>.vhd MAXIMUM=25000 TYPE=EXPANDABLE
SELECT VDISK FILE=C:\VHD\<filename>.vhd
ATTACH VDISK
CREATE PARTITION PRIMARY
FORMAT FS=NTFS QUICK
ASSIGN LETTER=V
EXIT
Note that the command diskpart in Windows 7 adds an additional option in Create named vdisk that wasn’t existed in the previous Windows.
Disk Management – GUI option
In Disk Management, click Action box from the top menu, and you can choose either Create or Attach VHD from the menu.

When creating a VHD, you need to specify the file name with location, size, and the format. It’s recommended using Fixed size from the performance stand point of view, but usually if you want to quick, you can always choose Dynamic which you can still change later on.

How to Create, Attach a VHD in Windows 7

We will be covering more on this topic, so stay tuned.

What To Do When Windows Explorer Is Not Responding In Windows 7

What To Do When Windows Explorer Is Not Responding In Windows 7


We all get error message like this “Windows Explorer is not responding” One of the reason is because the system is in a deadlock situation. To discover more what is computer deadlock click here. So what to do when Windows shown this kind error message? Well there are many reasons this kind error occur, no one perfect explanation for all different situation. Sometimes, when you insert a disk you will be unable to play what’s inside the disk and you get an error like this. Sometimes, when you try to install programs and it never ends error like this again. This is the most common error, there are two ways you can solve this, manually stop this, if you click “close the program” doesn’t work then
  • Tip #1 press “control + Shift + Esc” this will bring you the task manager, yes it’s not the old “control + Alt + delete“. When the task manage is up you can find which program uses the most CPU/memory, and manually stop them. Hopefully your computer won’t get frozen again.
  • Tip #2 this applies when you constantly getting this kind error, say whenever you do something your PC froze. So if you ever have this kind situation than there is a real problem. Inside the Windows 7 you can try to use a very useful tool that has already been build-in, it’s called the Problem Steps Recorder. ( find it just type “problem Steps recorder” in the start manual)

How To Turn off “uninstall” Internet Explorer 8 In Windows 7

 How To Turn off “uninstall” Internet Explorer 8 In Windows 7
Windows 7 has made some improvements in regarding restricting software that come with the operating system. The new feature in Windows 7 is that you can “uninstall” some of the unwanted and unused applications such as the Internet Explorer 8.
Not saying that Internet Explorer 8 isn’t useful, but yet more and more people are start using Firefox, Chrome, Safari, etc. So back in the previous windows versions, Internet Explorer can’t be removed from the Windows OS. Although, it’s the same in Windows 7, you can now “hide” the Internet Explorer like it’s gone from the system.

Here is how:

 Start manual, type “features” -> Turn Windows features on or off

 How To Turn off “uninstall” Internet Explorer 8 In Windows 7

Now you can uncheck the “Internet Explorer 8” from your Windows 7.
Note:[turn off this might affect other programs installed]
You also turn off other features, for example Tablet PC, if you are not on a Tablet than there is no need to have this feature to be on.

What Is Hiberfil.sys And How To Delete In Windows 7 Free Up Hard Drive Space

What Is Hiberfil.sys And How To Delete In Windows 7 Free Up Hard Drive Space
As from our last post, why your hard drive is always shrinking even though you did not do anything, we talked about using the freeware TreeSize to view where you have the largest chunk of data on your hard drive. If you look deep enough you will found out that there are two files called pagefile.sys and hiberfil.sys that occupy over few GB of hard drive space. If you are the kind person that does not use Hibernate then this article is for you.
When you turn off your computer using hibernate, the operating system needs to store all your current running program states onto hard disk so that programs can resume where they left off when you power up your PC again. To achieve this, the OS need to save all the information into a file called hiberfil.sys. Windows OS (7, vista, XP) usually stores this as a hidden file under your C directory or your main OS partition.
[ad#In Post]
So if you never use hibernate, than its time for you to get your hard drive space back.
[Note: Hibernate mode is not sleep mode. When hibernating your computer completely shuts down, however, under sleep mode your PC is not completely shut down; it still consumes a small amount of power.]
The best way to delete hiberfil.sys or disable hibernate:
  • Go to Start menu, type “cmd” open up command prompt
  • Type “powercfg.exe -h off” [make sure you are an Administrator]
  • ENTER
  • Type “exit”
  • ENTER

Migrating User Profile From Windows XP To Windows 7

Migrating User Profile From Windows XP To Windows 7


Moving user profile from one computer to another on same operation system is never easy, migrating from one OS to another is even harder because the file structure may be diff in different OS. It’s always been a challenger to either end user or IT pros.
Here is a step by step Silverlight video up on Technet that shows in detail how to use the User State Migration Tool (USMT) to migrate user files and settings (aka user profiles) from Windows XP to Windows 7 using a default installation. You can also download the video in WMV format as well if you don’t like install Silverlight on your computer.

Windows 7 Aero Shake & Snap With Keyboard Shortcut


 Windows 7 Aero Shake & Snap With Keyboard Shortcut
 
The new Windows 7 introduced few new unique features, which you won’t find in Macintosh or Linux. Aero Snap is a new feature that allows you to drag your window onto the edge and the whole window will auto resize. For example, when you drag a window to the right edge, the new window will auto resize to fit just right half of your whole desktop. Vice versa when you drag the window to the left, it will fit the left half of your monitor.
Drag the window to the top edge, it will auto resize to fix maximum. To restore previous windows size just drag window out from the edge. This will automatically resize the window to its original size.

Aero Shake, works when you have multiple windows open at the same time, this will allow you to hide the other window other than the one you’ve selected. When you select a window, hold the top bar and shake, shake it real hard. And Woha ! You should see all your other windows minimized to the Super bar

Some keyboard shortcut that also does the job.
Windows key + Home = Aero Shake (hide all window other than the current active window)
Windows + up arrow = Snap top (maximize current window)
Windows + down arrow = Minimize to the Super Bar
Windows + left/right arrow = Snap left/right
Windows + T = Preview/Scan active windows in Super Bar to open press enter
Windows + (+/-) to zoom in/out
Windows + Space = preview desktop all active window become transparent
Some old useful windows keyboard shortcuts:
Windows + E = launch Windows Explorer
Windows + D = Show Desktop
Windows + M = Minimize all windows
Windows + Tab = Aero application switcher
Alt + PrintScreen = print current windows only